Working with Large Models
When working with large models that cover extensive geographic areas, such as federal states or large cities, several key practices help maintain efficiency and clarity. The area designated for simulations is referred to as the Modeling Region. This guide outlines best practices, including systematic decomposition of the domain into Work Tiles, tracking the work states of these tiles, and managing specific tasks like editing culverts.
Domain as a Scenario Parameter
In scenarify, the Simulation Domain itself can act as a scenario parameter. Instead of creating multiple projects for different regions within a large domain, it is better to specify different Simulation Domains within separate scenarios of the same model. This approach is advantageous, because all scenarios inherit model parameters from their parent scenarios, ensuring consistency across different regions of the model and simplifying maintenance. Rather than manually configuring parameters for each individual region, model adjustments should be made at base scenarios or top-level scenarios and will then cascade down to all child scenarios. This reduces the risk of errors, streamlines modifications, and ensures that all scenarios remain aligned with the overarching model setup.
For instance, when modeling a large city, where the Modeling Region includes the entire municipal area, you should manage city quarters as part of the overall model within the same scenarify project. Each city quarter is then represented by a dedicated scenario with its own Simulation Domain:
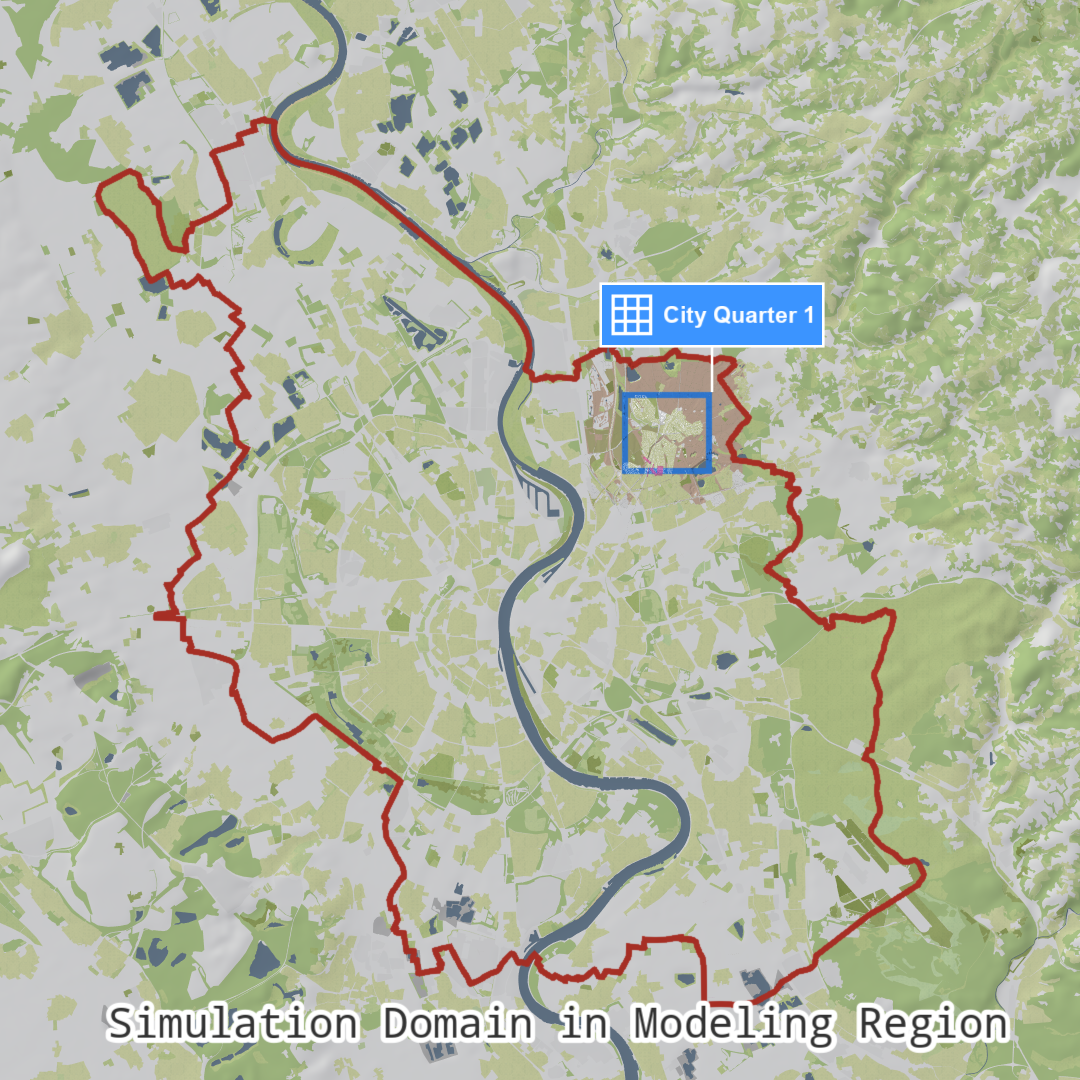
When mapping river flood hazards, specific considerations for the Simulation Domain apply. These are detailed in the task-based workflow on River Flood Modeling for Large Regions.
Additionally, you can utilize the domain decomposition of the Modeling Region into Work Tiles to further streamline the simulation process and systematic action editing.
Work Tiles for Systematic Action Editing
Breaking down large models into manageable sections, so-called Work Tiles, is key to efficient and systematic handling. As mentioned above, it is better to decompose the modeling region into Work Tiles rather than creating separate projects.
Display the Work Tiles (shown in gray) for the Modeling Region (outlined in red) by switching to the Visual Preset Setup: Work Tiles:

If the Modeling Region has not yet been defined, you can specify it in the Simulation Settings Panel, such as specifying the boundaries of a large city. For Base Models, like the RLP base model, the modeling region is pre-configured.
Hint: Use the Settings Search Widget located on the right side of the Application Bar to quickly access settings, e.g. search for “Modeling Region.”
Optionally, you can adjust the Work Tile Settings in the Layers: Vector Mapping category in the Visualization Settings Panel:

If you decide to change the Work Tile settings, proceed with caution. Depending on your hardware and the desired cell size of the Simulation Domain, practical Work Tile Size values range from 2 to 5 kilometers. Be sure to set the Work Tile Domain Buffer so that each action (e.g., each culvert) is fully contained within a buffered Work Tile. If an action, like a culvert, crosses a tile boundary (e.g., part of a culvert extends outside a tile), it will be marked as inactive due to an invalid end position.
Remark: Once the Work Tile size is selected, it must remain fixed from there on. Maintaining this consistency ensures accurate tracking of changes and actions within each tile, such as when using the Work Tile Status action.
The Work Tile Status action allows you to track progress within the modeling region. Each Work Tile Status enables you to store the progress, the author, and a description.
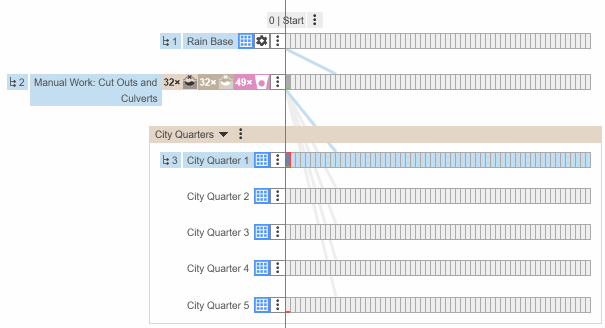
It is recommended to group all manual actions into separate scenarios based on their action type, keeping workflows organized and scenarios focused on specific tasks. Thus, we create a Culvert scenario for all manually edited Culvert actions.
It is also helpful to create a parent scenario for action editing, e.g. a Work Base scenario, and add the following parameters to it:
- Set the Default Cell Size in the Action Tool Panel of the Simulation Domain to the resolution of the underlying DTM, e.g. 1 m. Newly created simulation domains are then set up with a cell size equal to the default cell size.
- Deactivate infiltration and interception (if enabled) in the Simulation Settings Panel for faster simulations.
- Set the rain type to Spatially Uniform and increase the rain rate to 100 mm/h in the Simulation Settings Panel.
Next, create a Work scenario on which the actual Simulation Domain assignment and action drawing happens. The parent of this scenario should be the Work Base scenario. Your scenario hierarchy should now look like to this:

On the Work scenario, go through each Work Tiles and repeat the following steps:
-
Setup the Current Work Tile: Assign a Work Tile Status and a Simulation Domain to the Work Tile you are working on. Enable labels for the Work Tile Status in the Action Tool Panel to display and edit metadata:

-
Add and Edit Actions: Make all necessary edits for the actions that need to be manually added or corrected.
Hint: Use Quick Access in the Action Tool Selector for fast transitions between different tools during editing.
-
Simulate: After completing the edits for the current work tile, simulate a few time steps to verify that everything is set up properly and functioning as intended.
Hint: Switch to an appropriate Visual Preset, e.g. Surface: Culverts, or create a custom preset that suits your needs (e.g., including terrain coloring).
-
Move Actions: Once the actions have been verified, transfer them to the appropriate parent scenario. First, activate the desired parent scenario. Then, use the Move All to Active Scenario option in the Action Settings Panel for the actions (e.g., culverts).

For example, move all culverts to a Culverts scenario where all culvert actions of the different Work Tiles are stored:

-
Change Work Tile Status: Update the status of the current tile to Complete :)
