Scenario Management
Scenarios are fundamental to exploring and comparing different configurations or outcomes within a model. World Lines provide a structured way to manage these scenarios, enabling the creation, modification, and analysis of various scenarios efficiently. Refer to the Quick Start Tutorial for basic usage.
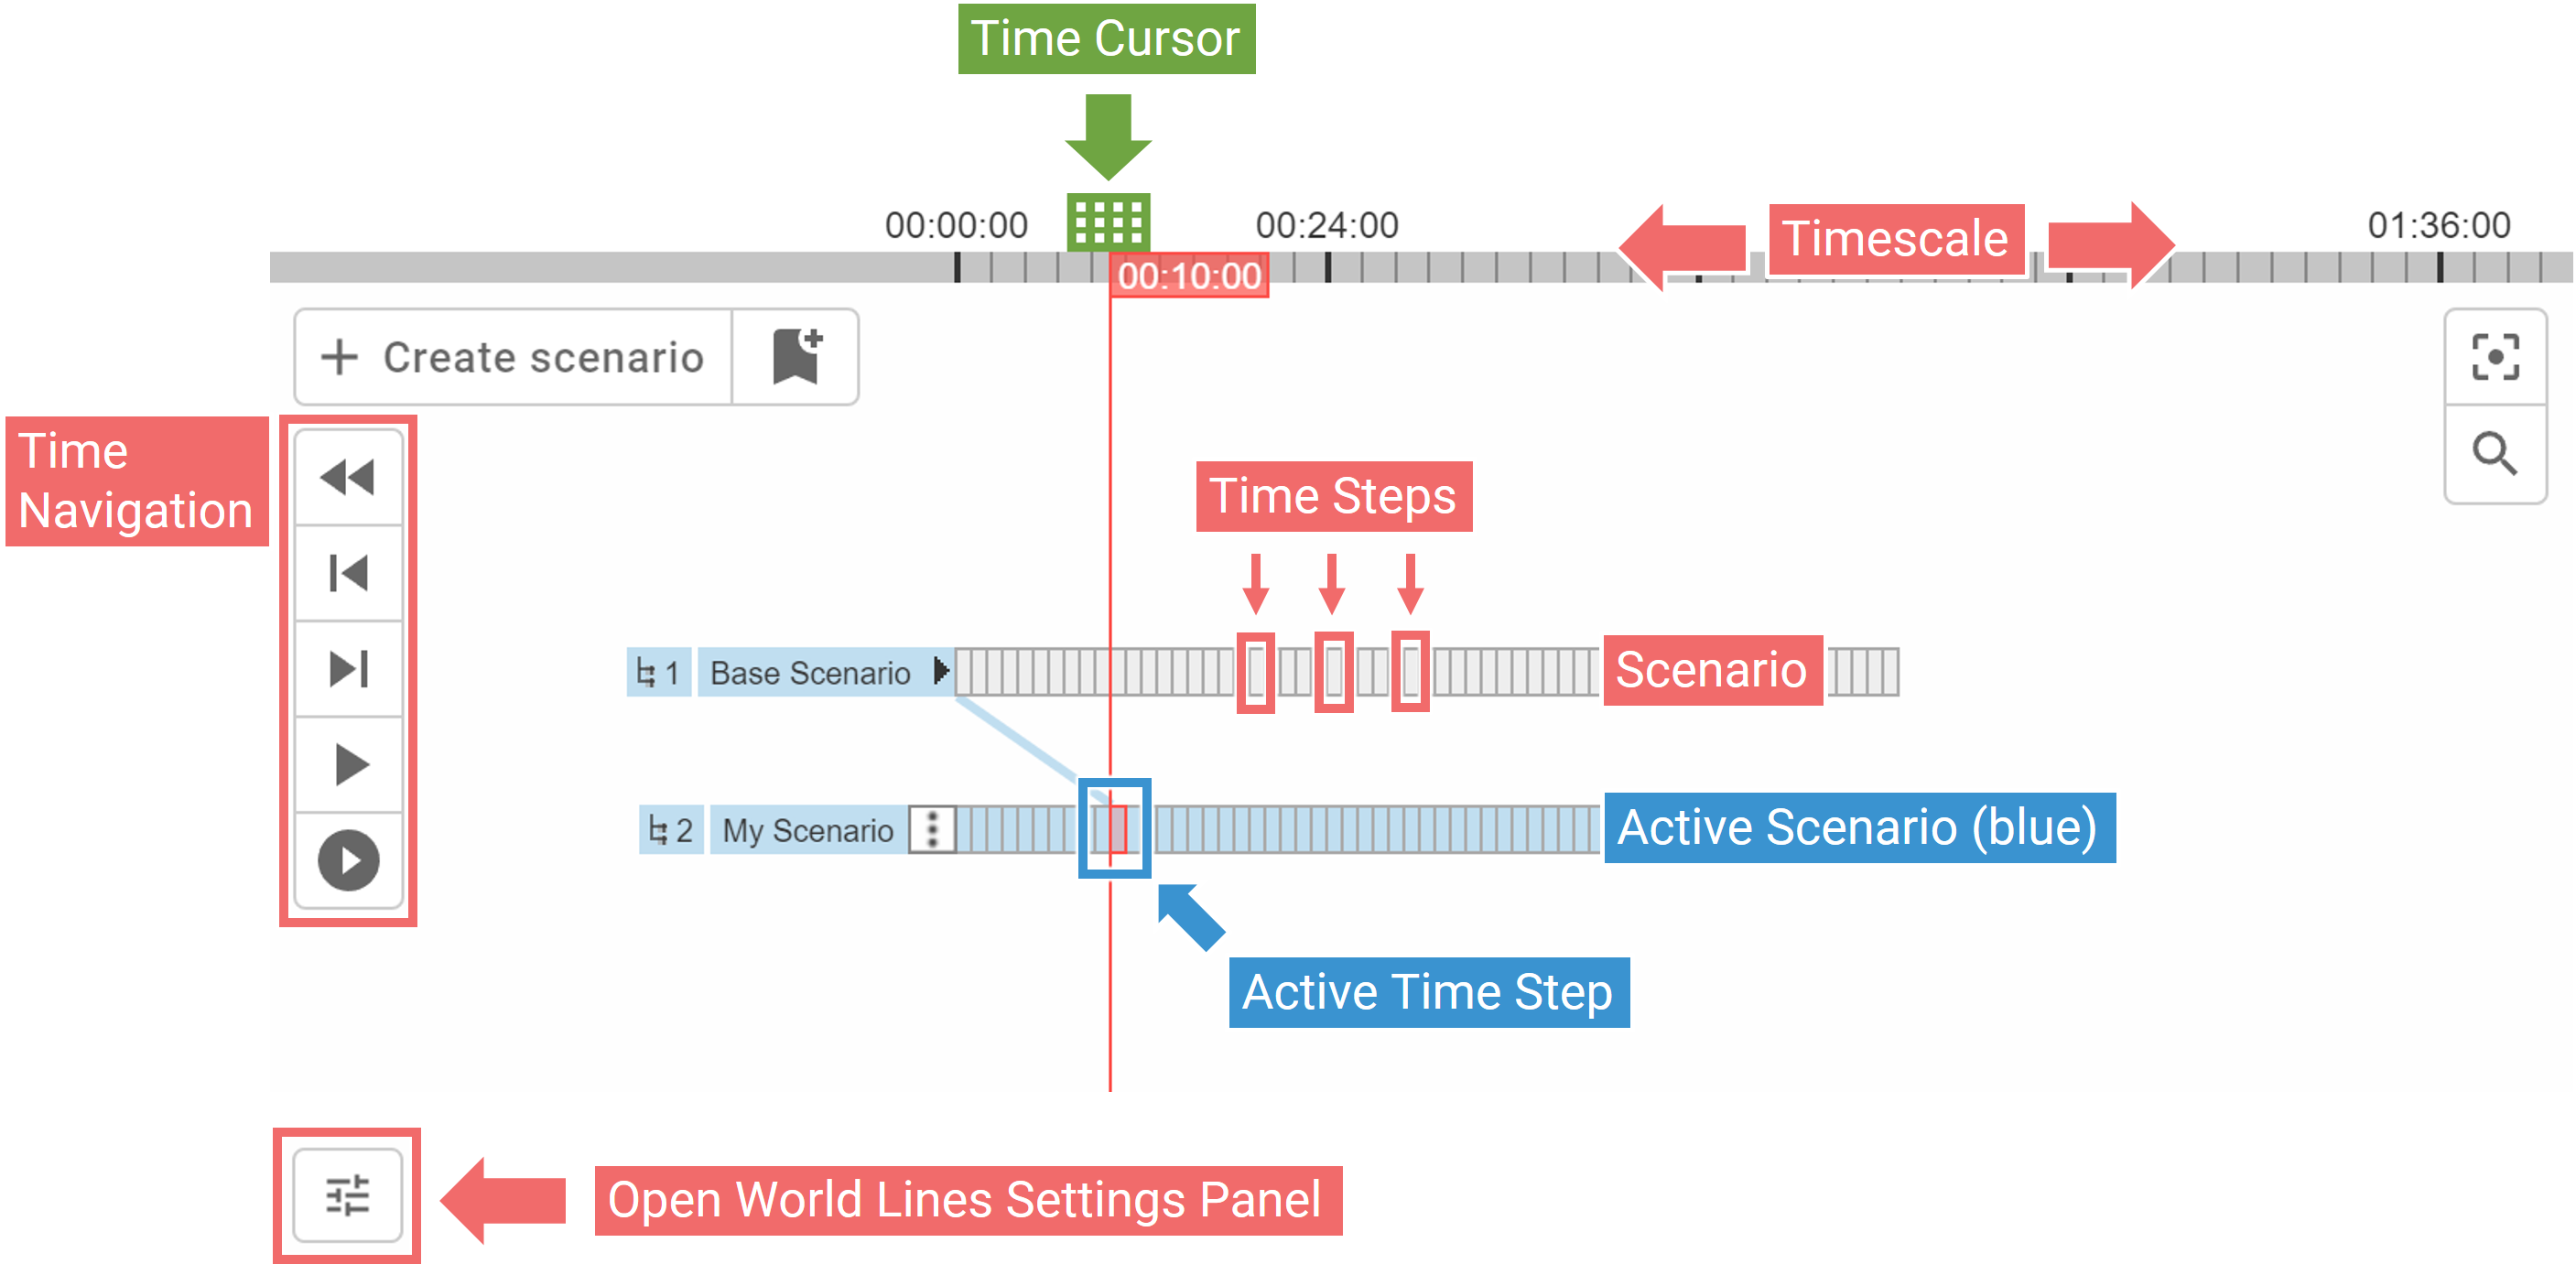
Overview of the World Lines Interface
-
Timescale with Time Cursor: The Timescale represents the horizontal time axis, with a movable Time Cursor that allows you to navigate through time.
-
Scenario and Time Steps: Each scenario is depicted as a timeline composed of consecutive Time Steps from the underlying simulation.
-
Active Scenario and Active Time Step: The currently active scenario is highlighted in blue. The Active Time Step is determined by the intersection of the Time Cursor and the Active Scenario. All model settings, visualizations, and operations are synchronized with this Active Time Step.
-
Time Navigation: Time navigation buttons, identical to those in the View, are conveniently located next to the scenarios when World Lines are displayed, facilitating easy temporal navigation.
-
World Lines Settings Panel: This panel allows you to control the display granularity of the timescale and manage output directories for batch processing multiple scenarios.
Multi-Scenario Operations Menu
Just like selecting multiple icons on a Windows desktop, you can click and drag to create a yellow rectangular box (rubberband) around multiple scenarios. This allows for multi-scenario selection. Once selected, a context menu appears with options such as deletion, timing adjustments, batch processing, and switching to scenario comparison mode (for 2 scenarios) or combination mode (for more than 2 scenarios).
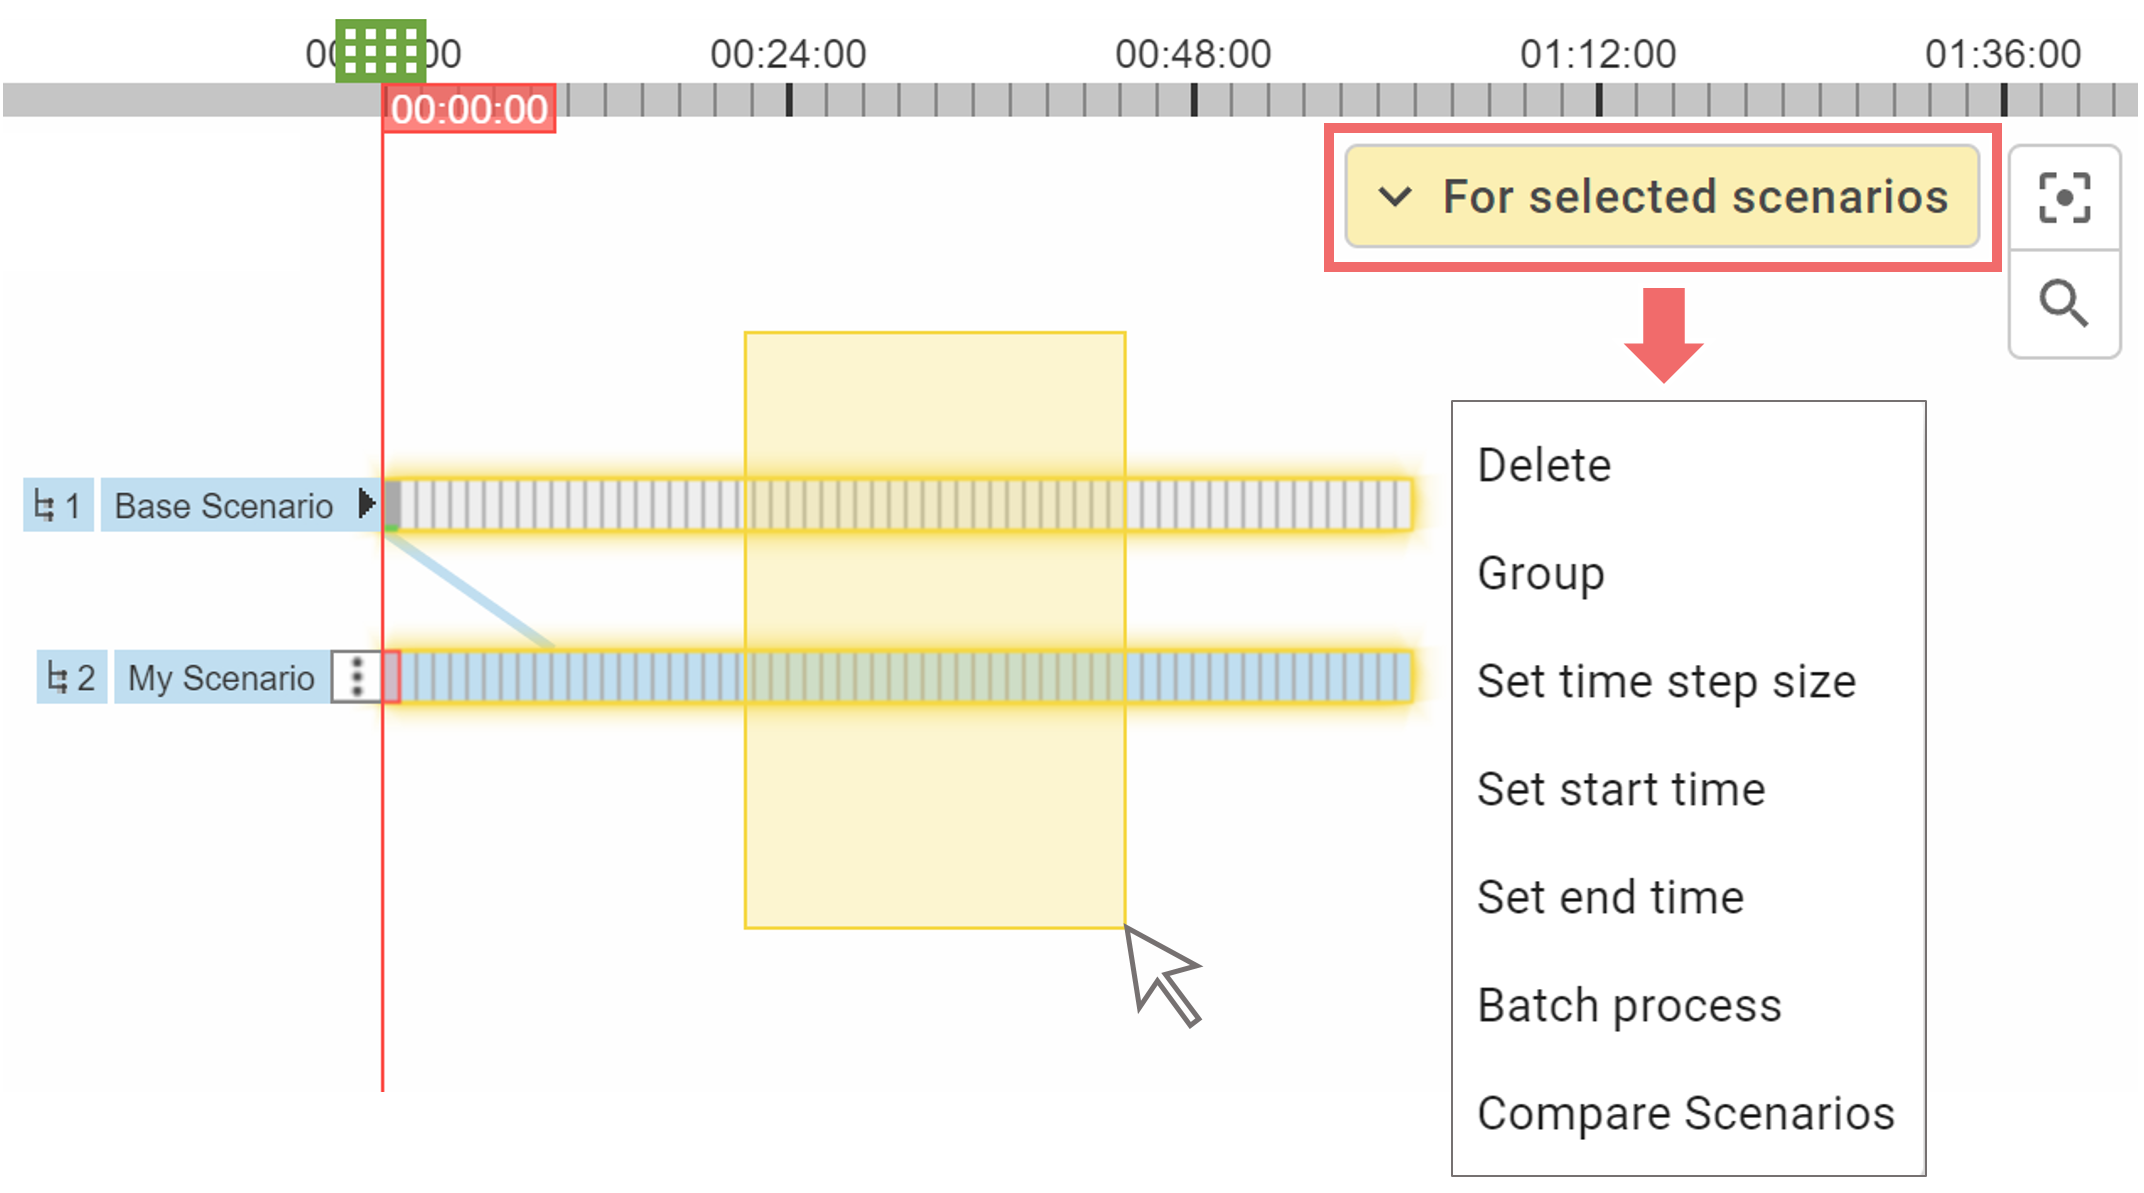
Hint: Hold the Ctrl key while drawing additional yellow rubberbands to add more scenarios to your selection, offering more flexibility for multi-scenario operations.
Overview on Scenario Components
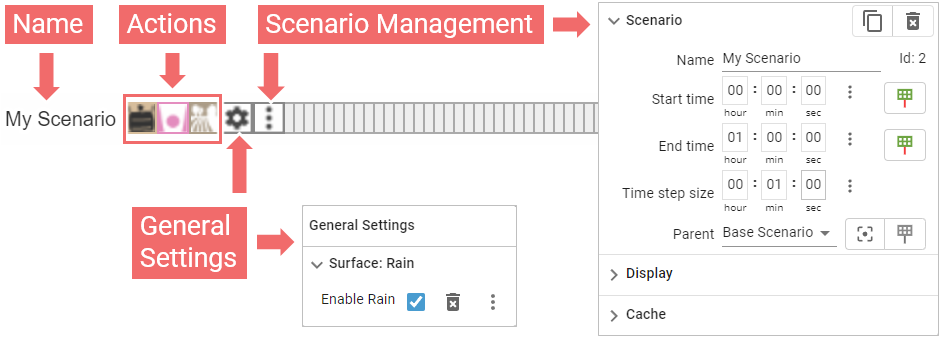
Next to the scenario name, you’ll find icons and buttons for configuration and management. The name label can be clicked to hide/show all these icons and buttons.
-
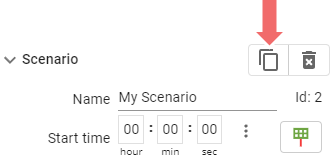
Scenario Management Panel: Allows you to modify core properties of the scenario, including its name, timing parameters (start time, end time, time step size), and its parent scenario. Provides buttons to copy and remove the scenario.
-
General Settings Panel: Displays global simulation settings specific to the scenario. This panel appears when any global setting is associated with the scenario.
-
Actions: Lists all actions assigned to the scenario as icons. Actions of the same type are grouped together. For more details, refer to Action Representation in World Lines.
Creating Scenarios
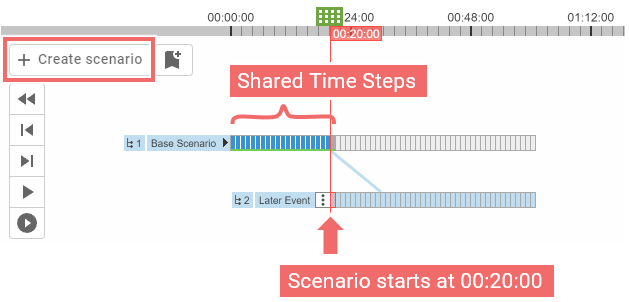
Use the Create Scenario button to generate a new scenario based on the active scenario.
Typically, scenarios start at time step 0. On creation, if the active time step is not 0, the system will prompt you to decide whether to start the new scenario at a time step greater than 0. In this case, the new scenario will use the time steps of the parent scenario up to its start time.
This feature is particularly useful for:
-
Performance and Memory Optimization: By sharing time steps with the parent scenario until the start time, simulation time is saved and memory usage is reduced.
-
Introducing Changes at a Later Time: Ideal for scenarios such as modeling a dike breach after a river flood has peaked, allowing for more accurate simulations of events occurring later in the timeline.
Use the Copy Scenario button in the Scenario Management Panel to duplicate a scenario, including all its settings and actions.
Understanding the Scenario Hierarchy
Scenarios are structured in a hierarchical manner, where each scenario originates from another, forming a tree-like structure. This hierarchy is crucial for understanding how settings are inherited across different scenarios.
Scenario Inheritance
Scenarios inherit settings from their parent scenario, and this inheritance continues up the chain through all ancestor scenarios. Unless explicitly overridden, the settings from a parent scenario are passed down to its children. This forms a scenario hierarchy, where terms like "parent," "children," "ancestors," and "descendants" are used to describe the relationships between scenarios.
Visual Representation in World Lines
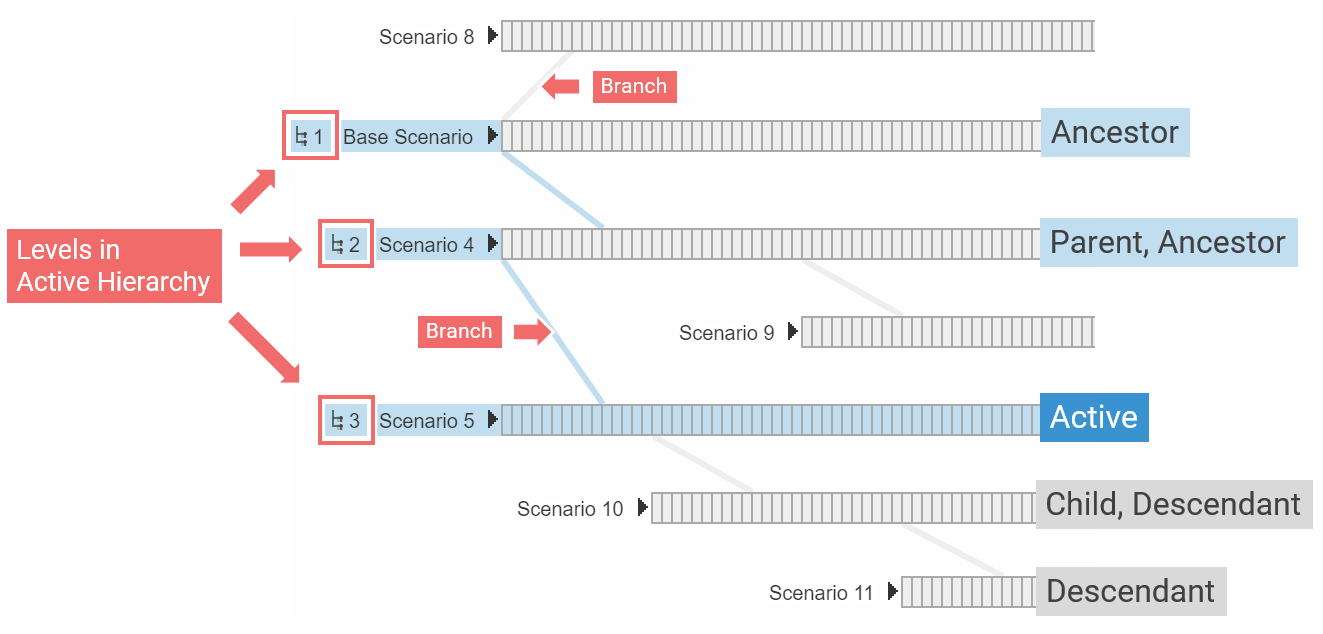
The hierarchical relationships between scenarios are visually represented in the World Lines interface. Scenarios are connected by branches that denote their relationships. The active scenario determines the active hierarchy, which is visually highlighted:
- Active Hierarchy: All scenarios within the active hierarchy are marked with a blue name label and an icon indicating their level within the hierarchy.
- Branches: The visual branches connecting scenarios are colored blue if they are part of the active hierarchy.
This visual structure helps users quickly identify the active hierarchy and understand the flow of inherited settings.
Modifying the Scenario Hierarchy
If you need to change the parent scenario for a particular scenario, you can do so through the Scenario Management Panel. This allows you to reorganize the hierarchy as needed, ensuring that your scenarios inherit the correct settings.
Navigating Scenarios
To switch the active scenario, simply click on its timeline with a left mouse click. Once a scenario is active, all time navigation, including the use of the Time Navigation Bar, will be governed by this scenario. For example, playback will follow the time steps of the active scenario.
Time steps that have been visited and processed (i.e., those with simulation progress and stored results) are visually distinguished by a darker color—dark grey for inactive scenarios and dark blue for the active scenario.
Custom Time Navigation Features
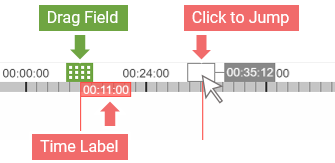
- Click and hold the Drag Field of the Time Cursor to move back and forth across time arbitrarily. If time steps with progress are visited, the system updates immediately while the mouse button is still held down. Time steps without progress are only processed when the mouse button is released.
- Click directly on the Time Scale to jump to a specific time step. You can also manually enter a target time step by using the Time Label of the Time Cursor.
Hint: If you accidentally jump too far forward, causing an extended simulation run when you intended to make further edits, click the Cancel button in the Application Bar to stop the simulation.
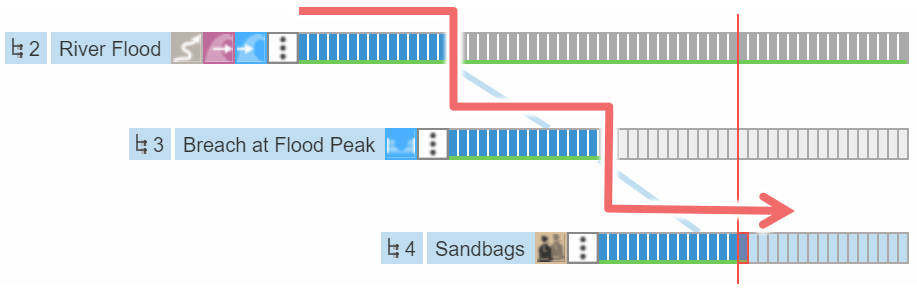
Special Behavior for Scenarios with a Start Time > 0
When scenarios with a start time greater than 0 are involved in the active hierarchy, playback follows the chain of involved scenarios. This chain represents the sequence of events described by the scenarios. For example, a river flood scenario might progress through stages such as reaching the peak, a breach occurring, and then deploying sandbags to protect critical infrastructure like a hospital.
Creating and Managing Settings per Scenario
When modifying settings that affect the simulation behavior (e.g., changing a setting in the Simulation Settings Panel), these settings are typically added automatically to the active scenario. This occurs unless the active scenario is the startup scenario for projects created with "New Blank."
Similarly, when actions are drawn, they are automatically added to the active scenario (see Actions and Scenarios). In some cases, such as when modifying a setting of an inherited action, the system will prompt you to choose whether to add the changed setting to the active scenario only or to apply the change to all scenarios. In rare cases, settings are always changed for all scenarios (e.g., for managing a comprehensive list of landuse synonyms).
When settings are added to a scenario, the system automatically switches to Edit Mode to prevent any immediate loss of simulation progress or unintended re-simulation. To apply the changes explicitly, click the Run button.
Managing Settings with the General Settings Panel
The General Settings Panel displays all global settings that have been specified for the active scenario. Each setting includes a delete button and a three-dot menu with additional options:
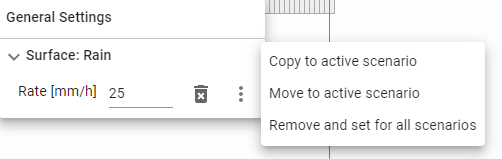
- Delete: Remove the setting from the scenario.
- Move: Transfer the setting from its current scenario to the active scenario.
- Copy: Duplicate the setting from its current scenario to the active scenario.
- Remove and Set for All Scenarios: Apply the setting value to all scenarios (unless the setting is also defined there), then remove it from the current scenario.
Visual Indicators for Scenario-Specific Settings
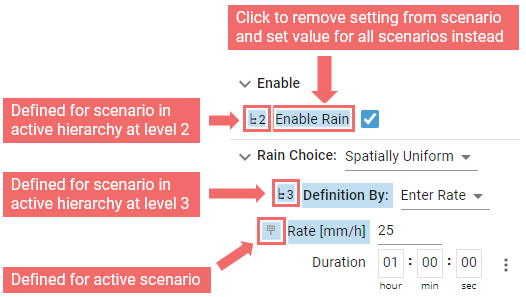
Settings panels, such as the Simulation Settings Panel or Action Settings Panels, visually indicate whether a specific setting is defined for the active scenario or any scenario within the active hierarchy. Settings labels are highlighted in blue to enhance visibility. An icon to the left of the settings label serves as a navigational tool, allowing you to focus on the respective scenario in the World Lines view. The icon's appearance varies depending on the setting's location:
- Active Scenario: A Time Cursor icon is displayed.
- Other Scenarios in the Active Hierarchy: An icon indicating the hierarchy level of the scenario that defines the setting is shown.
Clicking the settings label allows you to remove the setting from the scenario using the Remove and Set for All Scenarios operation. This applies the setting to all scenarios (unless already defined) and then removes it from the current scenario.
Cache Management per Scenario
A smart cache stores computationally expensive results on a hard disk to avoid repeating calculations each time a scenario is run. The cache intelligently tracks all model settings, ensuring that only outdated elements are recomputed when settings change.
Cache Validity and Visualization
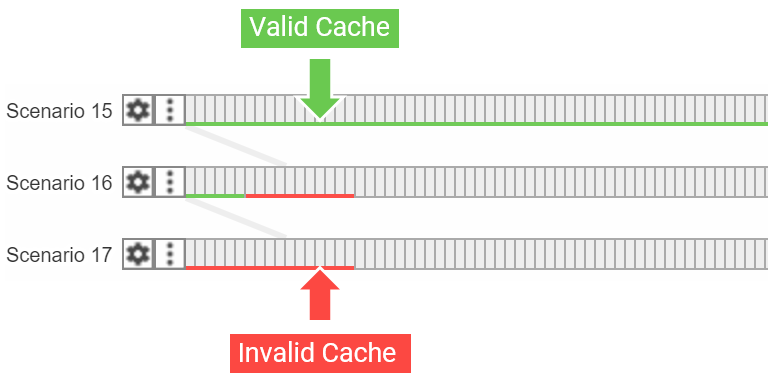
Cache entries are not automatically deleted when model settings change. Instead, these entries become invalid. In the World Lines view, cache status is visually indicated:
- Valid Cache: A green border at the bottom of time steps indicates a valid cache.
- Invalid Cache: A red border at the bottom of time steps signifies an invalid cache. Note that cache invalidation is not immediately displayed when settings change—it only updates upon project reload.
Managing Cache per Scenario
The Scenario Management Panel provides tools to control the cache for each scenario:
- Delete Scenario Cache: Deletes the cache for the current scenario, allowing for a fresh computation without using cached data.
- Enable/Disable Caching: Controls whether caching should be enabled for time steps. Disabling this option restricts caching to time-independent processes, such as data loading in the simulation domain.
- Lock Cache: Disables smart cache tracking, ensuring that the cache remains intact regardless of changes to model settings. However, this can lead to inconsistencies or errors if the cache relies on outdated settings, such as incorrect cell sizes in a simulation domain.
Navigating the View
When working with multiple scenarios, effective navigation within the World Lines view becomes essential. Here are the key tools and techniques:
- Zoom (Time Axis): Use the mouse wheel to zoom in and out along the time axis. The zoom will center on the current mouse position, allowing for precise control.
- Pan: Click and hold the mouse wheel to pan across the timeline and vertically.
- Center View on Cursor: Click the button located at the top right of the World Lines view to quickly center the view on the active time step of the current scenario.
- Search: To locate a specific scenario by name, use the search button at the top right of the World Lines view. Selecting a search result will automatically focus the view on the chosen scenario.
Layout and Grouping
scenarify offers the flexibility to experiment with as many distinct scenarios as needed within a single project. However, as the number of scenarios grows, organizing them effectively becomes essential to maintain clarity in the World Lines view.
Organizing Scenarios Vertically
To avoid visual clutter, scenarios can be repositioned vertically within the World Lines view:
- Simple Drag-and-Drop: Click and hold the left mouse button on a scenario to drag it up or down the list.
- Shift-Drag for Multiple Scenarios: Hold the
Shiftkey while moving a scenario to also move all scenarios positioned below it. - Rubberband Selection: Select multiple scenarios using the rubberband method. Once selected, drag any of the selected scenarios to move them all at once.
Managing Visual Branches
Visual branches indicate hierarchical relationships between scenarios but can cause clutter when many scenarios are present. The Scenario Management Panel provides options to:
- Hide the branch connecting a scenario to its parent.
- Hide branches connecting a scenario to all its children.
Grouping Scenarios
To enhance the organization of your scenarios, the World Lines view allows you to group them into visual clusters:
Creating a New Group:
Select the scenarios you want to group using the rubberband method. In the multi-scenario operations menu that appears, choose Group.
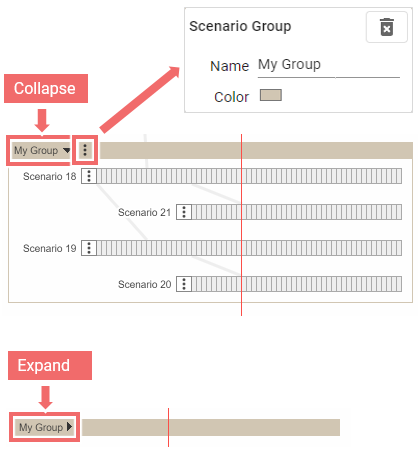
Managing Group Properties:
Use the three-dot menu on the group to change its name and color, and to remove the group.
Collapsing and Expanding Groups:
Click on the group name to collapse the group into a single line or expand it to view all contained scenarios.
Repositioning Groups:
Drag and drop entire groups to reposition them vertically within the World Lines view for better organization.
Modifying Group Membership:
- To add a scenario to an existing group, drag the scenario over the expanded group and release it.
- To remove a scenario from a group, go to the Scenario Management Panel, select Display, and choose Remove from Group.
Batch Processing
Normally, using Time Navigation or the Time Cursor, you can simulate one scenario at a time (e.g., by jumping to the last time step and letting the system simulate until then).
However, when dealing with many scenarios, especially in high-resolution simulations, batch processing is essential.
To batch process multiple scenarios:
- Select the scenarios using the rubberband method.
- In the Multi-Scenario Operations Menu, choose Batch process.
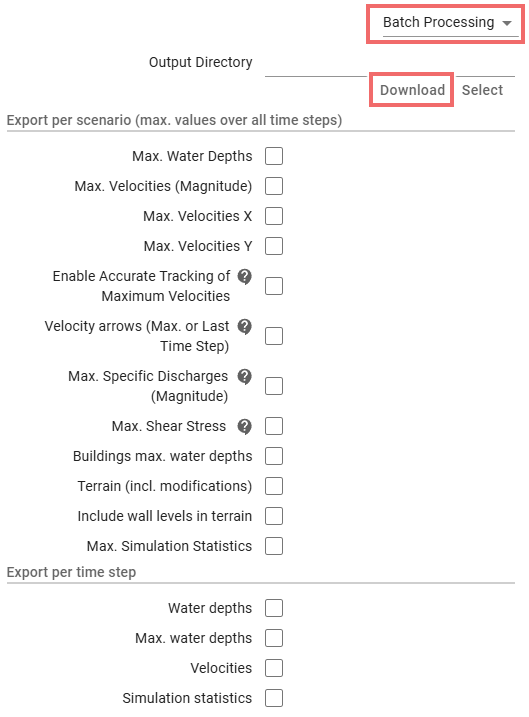
During batch processing, you can output simulation results per scenario (e.g., maximum water depth) or per time step (e.g., flow velocities). These outputs are saved in the user's designated output directory. Configure what to export and where to store it using the World Lines Settings Panel under the Batch Processing category.
After the batch process is complete, the same settings dialog allows you to download the results as a zip package.
Ensembles of Scenarios
This feature is set to debut in an upcoming release, scheduled for October 2026.
To read about the possibilities and advancements that will be introduced, refer to our publication: Many Plans: Multidimensional Ensembles for Visual Decision Support in Flood Management.